
Learning how to transfer a domain name from one registrar to another shouldn’t feel like solving a Rubik’s cube blindfolded. Yet, thousands of website owners hesitate because they fear downtime, lost emails, or breaking something important. Here’s the truth: transferring a domain is straightforward when you know the exact steps.
This comprehensive guide walks you through every stage of the domain transfer process, from checking eligibility to celebrating a successful migration. Whether you’re escaping expensive renewal fees, consolidating multiple domains, or simply seeking better customer support, you’ll find actionable answers here.
In the next 15 minutes, you’ll discover how to unlock your domain, obtain that mysterious authorization code, avoid the notorious 60-day lock, and complete your transfer without a single minute of downtime. Let’s transform what seems complicated into something remarkably simple.
What Exactly is a Domain Transfer?
Think of a domain transfer as changing the management company for your website’s address, not the address itself. Your domain name stays identical—what changes is who controls its registration records and renewal settings.
When you transfer a domain, you’re moving it from your current registrar (the company where you originally registered) to a new one. This process updates the official registry database, telling the internet that a different company now manages your domain’s administrative functions.
| Transfer Aspect | What Changes | What Stays Same |
| Domain registrar | ✓ New company manages it | Your actual domain name |
| Billing/renewal | ✓ New payment system | Your website content |
| Control panel | ✓ New dashboard access | Your visitor traffic |
| Support team | ✓ Different help desk | Your DNS records* |
| Pricing structure | ✓ New rates apply | Your SEO rankings |
*DNS records remain unchanged unless you specifically modify them.

Important Note: A domain transfer is NOT the same as changing web hosting. Your website files, databases, and email accounts stay with your hosting provider unless you separately migrate those services.
Why Would Anyone Transfer Their Domain?
The reasons for switching domain registrars vary widely, but most fall into three categories: cost, convenience, and capability. Understanding your motivation helps ensure you’re making the right decision.
The Money Factor
Some registrars lure customers with attractive first-year prices, then dramatically increase renewal fees. One website owner discovered their .com domain jumped from $12 to $45 annually after the introductory period. Transferring to a registrar with transparent, stable pricing can save hundreds of dollars across multiple domains.


Additionally, consolidating domains from various registrars eliminates multiple transaction fees, simplifies accounting, and often qualifies you for bulk discounts. Companies managing 10+ domains regularly save 25-40% by centralizing their portfolio.
The Convenience Advantage
Managing domains scattered across four different registrars means juggling four sets of login credentials, four billing cycles, four renewal reminders, and four control panel interfaces. This fragmentation creates dangerous scenarios where domains accidentally expire because renewal notices landed in spam folders.
Consolidation streamlines your entire domain management workflow. One dashboard, one payment method, one renewal date to remember. For businesses, this simplification reduces administrative overhead and minimizes the risk of costly oversights.
The Feature Gap
Not all registrars offer identical features. Some provide free WHOIS privacy protection, while others charge $15 annually. Advanced DNS management tools, two-factor authentication, API access for automation, and superior customer support vary dramatically between providers.
Perhaps you’ve discovered your current registrar lacks the specific tools your growing business needs. Maybe their domain privacy protection expired, exposing your personal information to spam bots and solicitors. Or their customer support takes three days to respond when you need immediate assistance.
Before You Start: Is Your Domain Transfer-Ready?
Not every domain qualifies for immediate transfer. The Internet Corporation for Assigned Names and Numbers (ICANN) enforces specific rules to prevent fraud and unauthorized transfers. Checking these requirements saves frustration later.
The Critical 60-Day Rules
✗ Cannot transfer if domain was registered within the last 60 days
✗ Cannot transfer if domain was transferred within the last 60 days
✗ Cannot transfer if registrant information was changed within the last 60 days
✓ Can transfer if all above conditions are satisfied
This 60-day lock serves as a security measure, protecting domain owners from hijacking attempts. However, some registrars allow you to opt out of the lock when changing contact information—though this option must be explicitly requested.
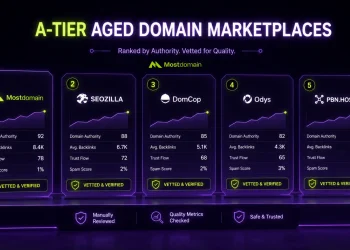
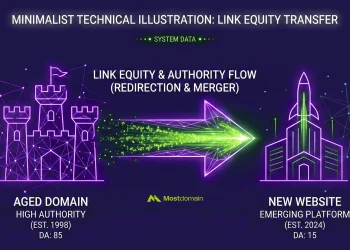
If you’re transferring an aged domain from a marketplace like mostdomain.com, ensure the previous owner completed any necessary contact updates at least 60 days before your intended transfer date. Aged domains often come with established history that makes them valuable, so protecting that asset during transfer is crucial.
The 12-Step Domain Transfer Process: Your Complete Roadmap
Now we dive into the practical mechanics. Follow these steps sequentially for the smoothest possible transfer experience. Each step builds on the previous one, creating a secure chain of verification.
Step 1: Choose Your New Registrar Wisely
Where you’re transferring matters as much as the transfer itself. The registrar you select impacts everything from pricing and features to customer support quality and long-term satisfaction.
Start by identifying what matters most for your specific situation. If you’re managing aged domains from mostdomain.com or similar marketplaces, look for registrars with robust bulk management tools. If security concerns top your list, prioritize providers offering two-factor authentication and advanced DNS protection.
Key Evaluation Criteria:
| Feature | Why It Matters | What to Look For |
| Pricing transparency | Avoids surprise costs | Clear renewal rates listed upfront |
| DNS management | Controls traffic routing | Advanced record types, quick propagation |
| Security features | Protects against hijacking | 2FA, registrar lock, DNSSEC support |
| Customer support | Solves problems quickly | 24/7 availability, multiple channels |
| Transfer policies | Smooth migration | Fast approval, no hidden requirements |
Create an account with your chosen registrar before starting the transfer. This preparation ensures you’re ready to act quickly when the time comes, reducing overall transfer duration.
Step 2: Update Your Contact Information First
Outdated contact details derail more transfers than any other factor. Both your current and new registrar will send critical emails requiring your response—miss these, and your transfer stalls indefinitely.
Log into your current registrar’s control panel immediately. Navigate to your domain’s contact information section, typically found under “Domain Management” or “WHOIS Information.” Verify every field contains accurate, current data.
Critical Warning: Changing your registrant name, organization, or email address triggers an automatic 60-day transfer lock at most registrars. If you must update this information, do it now and wait 60 days, or wait until after your transfer completes.
Pay special attention to your administrative contact email address. This inbox will receive authorization codes, transfer approval requests, and status notifications. If you’re using an email address tied to your domain, create a backup Gmail or similar address first—domain-based emails may become inaccessible during the transfer window.
Step 3: Unlock Your Domain for Transfer
Domain registrars apply a security feature called registrar lock (or transfer lock) by default. This lock prevents unauthorized parties from initiating transfers without your permission. You must manually disable it before proceeding.
Finding the unlock option varies by registrar, but common locations include the domain settings page under “Security” or “Transfer Settings,” the domain management dashboard with a lock icon toggle, or advanced domain settings under “Registrar Lock Status.” Some registrars require you to contact customer support if you cannot locate the unlock option.
The unlock process is usually instantaneous—simply toggle the lock status from “On” to “Off” or click an “Unlock Domain” button. Some registrars send a confirmation email before processing your unlock request. Save this confirmation; it proves you initiated the action.
Remember, unlocking your domain doesn’t automatically initiate a transfer—it simply makes the domain eligible to be transferred. Keep your domain unlocked only as long as necessary; re-enable the lock if you decide not to transfer or after completion.
Step 4: Obtain Your Authorization Code
The authorization code (also called EPP code, Auth-Code, transfer code, or transfer key) functions like a password specifically for domain transfers. This unique alphanumeric string proves you own the domain and authorize its movement.
Every legitimate registrar provides access to this code, though the retrieval process varies. Most modern registrars display it directly in your control panel. Common locations include the domain details page under “Authorization Code” or “EPP Code,” the transfer settings section with a “Get Auth Code” or “Reveal Code” button, or email delivery triggered by a “Send Auth Code” request.
The code typically consists of 8-32 characters mixing uppercase, lowercase, and numbers. Copy it exactly—these codes are case-sensitive. Store it securely but accessibly; you’ll need to enter it at your new registrar within the next few minutes or hours.
Pro Tip: Take a screenshot of the authorization code and its surrounding context. This documentation helps if you later encounter any disputes about when or how you obtained it.
Step 5: Disable WHOIS Privacy Protection Temporarily
Many registrars offer WHOIS privacy services that mask your personal contact information from public domain databases. While valuable for privacy, this service can complicate transfers because it replaces your real email address with a proxy.
If your domain currently uses privacy protection, temporarily disable it before initiating the transfer. This ensures transfer-related emails reach your actual inbox rather than bouncing through proxy services that might delay or filter crucial communications.
The disabling process typically involves logging into your current registrar account, navigating to domain privacy settings, toggling privacy protection to “Off” or “Disabled,” confirming the change, and waiting 15-30 minutes for changes to propagate.
Don’t worry about privacy exposure—this temporary disablement lasts only as long as your transfer process (typically 5-7 days). Once your transfer completes, immediately re-enable privacy protection at your new registrar.
Step 6: Initiate the Transfer at Your New Registrar
With preparation complete, you’re ready to start the actual transfer process. This step happens entirely at your new registrar—the company you’re transferring to, not the one you’re leaving.
Navigate to your new registrar’s domain transfer page. The exact location varies, but look for options like “Transfer a Domain,” “Transfer Domain to Us,” or “Import Domain.” Enter your domain name without the “www” prefix—just the core domain and extension.
The system performs an instant eligibility check, verifying the domain is unlocked, not in a restricted status, the domain extension supports transfers, and no obvious transfer prohibitions exist.
When prompted, paste your authorization code exactly as received. Double-check for extra spaces or missing characters—a single typo rejects the entire transfer request. Most registrars show an error message immediately if the code is incorrect, allowing you to try again.
Step 7: Confirm Transfer Authorization via Email
Within minutes of initiating the transfer, you’ll receive multiple emails. These communications come from both your current registrar (asking “Do you really want to leave?”) and your new registrar (confirming “Are you really joining us?”).
Each email contains critical action items. Your current registrar’s email typically includes a link to either approve or reject the transfer. Some registrars automatically approve after 5 days of no response, while others require explicit approval for faster processing.
Time-Saving Tip: Immediately approve the transfer from your current registrar’s email if you want the fastest possible completion. Without manual approval, ICANN rules require registrars to wait up to 5 business days before auto-approving transfers.
Check your spam folder if expected emails don’t arrive within 30 minutes. Sometimes overzealous filters catch transfer notifications, especially if you’ve never received emails from these registrars before. Whitelist both registrar domains to ensure delivery.
Step 8: Pay the Transfer Fee
Domain transfers aren’t free, but they’re typically reasonable—and often include benefits that offset the cost. Most registrars charge $8-$15 for .com transfers, with pricing varying by domain extension.
Here’s what makes the fee worthwhile: almost all registrars add one full year to your domain’s registration when you transfer. If your domain was set to expire in three months, after transfer it’ll expire in fifteen months. You’re essentially paying for a renewal plus the transfer service.
Typical Transfer Pricing:
| Domain Extension | Average Transfer Fee | Registration Extension |
| .com | $10-$15 | +1 year |
| .net | $12-$16 | +1 year |
| .org | $11-$15 | +1 year |
| .io | $30-$40 | +1 year |
| .co | $25-$35 | +1 year |
Some registrars offer promotional pricing for first-time transfers or bulk transfers. If you’re moving multiple domains simultaneously, ask about volume discounts. Domain portfolio managers often negotiate custom rates for 10+ domain transfers.
Complete the payment process using your preferred method. Most registrars accept credit cards, PayPal, and sometimes cryptocurrency. Save your receipt—it serves as proof of payment if any disputes arise during the transfer process.
Step 9: Monitor Transfer Progress
Once payment processes, your transfer enters the official waiting period. This phase typically lasts 5-7 days, though many complete faster if you approved the transfer at your current registrar.
Your new registrar’s dashboard shows a transfer status indicator. The progression typically moves from “Transfer Initiated” on Day 1, to “Pending” on Day 2, “In Progress” on Day 3, “Completing” on Day 5, and finally “Complete” by Day 7.
During this period, your website remains fully functional. Visitors can access your site normally, emails continue flowing, and DNS settings remain unchanged. The transfer happens behind the scenes at the registry level.
Set a calendar reminder to check progress every 48 hours. While you can’t accelerate the process once it’s running, monitoring ensures you catch any unexpected issues requiring your attention. If status shows “Failed” or “Rejected,” investigate immediately rather than assuming it’ll resolve automatically.
Step 10: Verify Transfer Completion
When your new registrar confirms the transfer succeeded, don’t just accept it at face value. Perform independent verification to ensure everything truly shifted properly.
Run a WHOIS lookup using a tool like ICANN’s official lookup service. Enter your domain name and review the registrar information. The “Registrar” field should display your new registrar’s name, not your previous one. If it still shows the old registrar, wait another 24 hours for database propagation.
Test your domain’s DNS resolution using command-line tools or online checkers. Ensure your website loads correctly and email services function normally. While DNS settings shouldn’t change during a transfer, verification catches the rare exception where something broke.
Save documentation proving successful transfer completion. Screenshot your new registrar’s dashboard showing the domain, download updated WHOIS records, and archive all transfer-related emails. This paper trail proves invaluable if you ever need to demonstrate ownership or transfer dates.
Step 11: Update DNS Settings (If Necessary)
In most cases, your DNS settings transfer exactly as configured, requiring no immediate changes. However, certain scenarios demand attention to maintain website and email functionality.
If your previous registrar provided DNS hosting (meaning they managed your DNS records as part of domain registration), you’ll need to reconfigure those records at your new registrar. Default registrar DNS servers typically stop responding once a domain transfers out.
DNS Migration Scenarios:
Scenario A – No Action Needed: Using hosting provider’s nameservers, using third-party DNS service like Cloudflare, or using custom nameservers all require no changes.
Scenario B – Action Required: Using old registrar’s default DNS means you must reconfigure at new registrar, if old registrar was hosting email you need to set up MX records, and any subdomains configured must be recreated.
If action is required, access your new registrar’s DNS management panel immediately after transfer completion. Before changing anything, export or screenshot your existing DNS configuration from your old registrar’s panel while you still have access.
Critical Reminder: DNS changes take 24-48 hours to fully propagate worldwide. Schedule DNS migrations during low-traffic periods and inform stakeholders about potential temporary issues.
Step 12: Cancel Previous Registrar Service
Your domain successfully transferred—congratulations! But you’re not quite finished. That old registrar account still exists, potentially leading to confusion or unwanted charges later.
Review your previous registrar’s account carefully. Check whether any automatic renewal settings remain active. Look for any remaining domains still registered there, active hosting services, email services, or other add-ons tied to your account.
If this was your only domain and you used no other services, you can safely close the account entirely. Most registrars provide an account deletion option in settings. Before closing, download any invoices or receipts for your records, save copies of previous DNS configurations, archive transfer-related email communications, and export any domain-related documentation.
Transferring from Specific Registrars: The Inside Scoop
While the 12-step process applies universally, individual registrars add their own quirks and requirements. Understanding these provider-specific details prevents unexpected delays.
Moving Away from GoDaddy
GoDaddy, as the world’s largest domain registrar, has a well-established transfer process. Their system is generally smooth, though watch for several nuances.
To unlock your domain and obtain the authorization code at GoDaddy, navigate to “My Products,” click your domain, scroll to “Additional Settings,” then select “Transfer domain away from GoDaddy.” The authorization code appears immediately on screen and also arrives via email to your account address.
GoDaddy applies an aggressive upsell strategy during the unlock process. They’ll show multiple prompts warning about features you’ll lose (many of which weren’t special to begin with). Simply decline these offers and proceed with your transfer. They may email special retention offers after you unlock your domain, privacy protection must be disabled before starting transfer, and they typically approve transfers within 24 hours if you click approval email.
If you purchased domain-based email through GoDaddy, those email accounts will cease functioning after transfer unless you migrate them to another email provider first. GoDaddy’s email service is tied to domain registration, not just DNS hosting.
Leaving Namecheap Behind
Namecheap built its reputation on transfer-friendly policies and transparent pricing. They make exiting almost as easy as joining—no guilt trips, retention schemes, or artificial barriers.
Access your authorization code through the Namecheap dashboard by clicking “Manage” next to your domain, scrolling to “Transfer Out” section, then clicking “Auth Code” button. They’ll email the code to your registrant email address within minutes.
Namecheap automatically unlocks domains when you request the authorization code, eliminating one step. However, verify the unlock status in the same transfer section—occasionally the system requires manual confirmation. They feature a very fast approval process (often under 1 hour if you confirm), excellent documentation for outbound transfers, and no pressure tactics or retention attempts.
One unique Namecheap feature: they continue providing DNS hosting even after your domain transfers out, as long as you keep your account active. This means zero downtime if you’re using their default nameservers, though transitioning to your new registrar’s DNS is recommended long-term.
Special Considerations for Premium and Aged Domains
Aged domains—those with established history and backlink profiles—require extra attention during transfers. If you acquired domains through mostdomain.com or similar aged domain marketplaces, follow these additional precautions.
First, verify the domain’s WHOIS history before initiating transfer. Aged domains sometimes carry expired privacy services, outdated contact information from previous owners, or pending legal issues that could complicate transfers. Run a historical WHOIS check to understand what you’re working with.
Second, ensure the marketplace properly transferred registrant ownership to you before attempting a registrar transfer. Some platforms transfer the domain directly to their registrar first, then to you—attempting a registrar transfer during this intermediate phase triggers conflicts and delays.
When working with aged domains, confirm clean title with no ownership disputes, verify 60-day waiting period since last ownership change, check domain’s transfer history as frequent transfers raise red flags, ensure backlink profile remains intact post-transfer, maintain DNS settings exactly as configured to preserve SEO, and document existing search rankings before transfer for comparison.
Some aged domains come with premium pricing at certain registrars. When transferring to a new registrar, verify they support the domain extension at standard rates—you don’t want surprise renewal fees later that negate your aged domain investment.
Common Domain Transfer Problems (And How to Fix Them)
Even following perfect procedures, occasional issues arise. Here’s how to troubleshoot the most frequent transfer complications quickly.
Problem 1: “Domain is Locked” Error Message
You initiated the transfer, but the new registrar immediately rejected it claiming your domain remains locked. This happens more often than it should, usually due to propagation delays.
The fix involves returning to your current registrar and verifying lock status shows “Unlocked,” waiting 30 minutes for the unlock to propagate through systems, then trying to initiate the transfer again. If still failing, contact current registrar support to manually verify unlock status and request they push the unlock status update to the registry immediately.
Some registrars implement multiple lock types—registrar lock and registry lock. Ensure all locks are disabled. Registry-level locks, especially, require explicit removal and aren’t always visible in standard control panels.
Problem 2: Authorization Code Not Working
You entered the authorization code exactly as provided, but the new registrar claims it’s invalid. This frustrating scenario stems from several possible causes.
The solution requires checking for invisible characters like spaces before or after the code, verifying code is still valid as some expire after 24-48 hours, requesting a new authorization code from current registrar, ensuring you’re using the code for the correct domain if managing multiple, and trying manual typing rather than copy-pasting to avoid encoding issues.
If problems persist, contact your current registrar’s support. They can verify whether the code in your possession matches their system records. Occasionally, registrars generate codes incorrectly or provide outdated codes from their cache rather than current ones.
Problem 3: Transfer Request Keeps Timing Out
Your transfer started successfully but now sits in “Pending” status for longer than expected, eventually timing out without completion or rejection.
Check your email (including spam) for approval requests, log into current registrar and manually approve the transfer, verify domain isn’t expired or in grace period, confirm payment processed at new registrar, and contact new registrar support to investigate registry-level issues.
Transfers sometimes stall due to backend technical issues between registrars and registries. The new registrar’s support team can query the registry directly to identify exactly where the process stopped and push it forward manually.
Problem 4: Website or Email Stopped Working Post-Transfer
Your transfer completed successfully according to both registrars, but now your website shows errors or emails bounce. This indicates DNS-related issues.
Run WHOIS lookup to confirm nameservers listed, check whether nameservers point to old registrar’s DNS, update nameservers to your hosting provider or new registrar, verify DNS records exist in current DNS hosting provider, and wait 24-48 hours for DNS propagation if recently changed.
This problem almost exclusively affects domains using their old registrar’s default DNS hosting. When the domain transferred, those DNS servers stopped responding. Recreate your DNS records at your new registrar or hosting provider, then update nameservers accordingly.
Best Practices: Transfer Like a Pro
Following basic steps gets your transfer done. Following best practices ensures smooth sailing and positions you for long-term success with your new registrar.
Timing Your Transfer Strategically
Never initiate domain transfers during critical business periods. Avoid transfers during product launches or major marketing campaigns, high-traffic seasonal events like Black Friday or holidays, when your technical team is unavailable during weekends or holidays, or within 30 days of domain expiration.
The ideal transfer window is during routine business periods when you can monitor progress actively. Mid-week transfers (Tuesday-Thursday) tend to process faster since registrar support teams are fully staffed and not dealing with weekend backlogs.
Documentation is Your Best Friend
Maintain comprehensive records throughout the transfer process. Create a simple spreadsheet tracking domain names, start dates, current status, authorization codes, transfer IDs, and completion dates.
For each domain, save screenshots of unlock confirmation, copies of authorization codes, all transfer-related emails, payment receipts, pre-transfer DNS configuration, and post-transfer verification results. This documentation proves invaluable if disputes arise, if you need to reverse decisions, or when transferring additional domains later using lessons learned.
Secure Your Domain Immediately
The moment your transfer completes, enhance security settings at your new registrar. Domains are most vulnerable to hijacking during transition periods when security measures might be temporarily relaxed.
Re-enable registrar lock (this should be automatic, but verify), enable two-factor authentication for extra login protection, activate WHOIS privacy to protect personal information, set complex account password unique to your registrar account, review authorized contacts and remove anyone who shouldn’t have access, and enable DNS security features like DNSSEC if your registrar supports it.
Consider setting up transfer lock alerts. Some registrars email you immediately if someone attempts to unlock your domain or requests an authorization code—giving you instant warning of potential hijacking attempts.
Frequently Asked Questions: Your Transfer Doubts Answered
How Long Does the Entire Process Actually Take?
The technical transfer itself completes in 5-7 days once initiated. However, the total timeline from decision to completion depends on your preparation. Immediate transfer with optimal prep takes 5-7 days, quick transfer with minimal prep takes 7-10 days, and delayed transfer when unprepared can take 2-3 weeks or more.
The 5-day minimum exists because ICANN rules give your current registrar 5 days to approve or deny. If they don’t respond, the transfer auto-approves. You can accelerate this by manually approving through your current registrar’s transfer confirmation email.
Will My SEO Rankings Drop During Transfer?
No. Search engines don’t penalize domains for changing registrars. Your domain name stays identical, DNS records remain unchanged (unless you modify them), and search engines can’t even detect when registrar changes occur.
The only SEO risk comes from mishandling DNS during transfer. If you accidentally break your website or cause extended downtime, that impacts rankings—but the transfer itself is invisible to search engines.
Can I Transfer Just My Domain Without Changing Hosting?
Absolutely. Domain registration and web hosting are completely separate services, even when purchased from the same company. You can transfer your domain to a new registrar while keeping your website, files, and databases at your current hosting provider.
Your hosting provider gave you nameservers when you set up hosting. As long as your domain continues pointing to these nameservers, your website remains unaffected by registrar changes happening in the background.
What Happens If My Domain Expires During Transfer?
If your domain expires after you initiated the transfer, the transfer typically continues processing. ICANN rules prohibit registrars from rejecting transfers solely because renewal fees are unpaid.
However, if your domain expires before initiating transfer, you must renew it first. Most registrars won’t process transfer requests for expired domains. Additionally, domains in “Redemption Period” (30-60 days after expiration) require expensive restoration fees before becoming transferable again.
Best Practice: Always transfer domains with at least 45 days remaining before expiration to avoid these complications entirely.
Do I Really Need to Transfer, or Can I Just Point Nameservers?
This depends on your goals. Pointing nameservers to a new hosting provider is completely different from transferring your domain registration.
Pointing nameservers changes where your website is hosted, doesn’t change who manages domain registration, takes 24-48 hours for DNS propagation, requires no registrar approval, and is a free process.
Transferring domain registration changes who controls your domain registration, consolidates management under new registrar, takes 5-7 days for complete process, requires approval from both registrars, and usually costs $10-15 per domain.
If you’re unhappy with hosting speed but satisfied with your registrar, point nameservers. If you want better registration pricing, features, or support, transfer your domain.
Can I Cancel a Transfer After Starting It?
Yes, domain transfers can be canceled anytime before final approval, though the method varies. Most registrars include “Reject Transfer” or “Cancel Transfer” buttons in the transfer notification email at your current registrar. Clicking this immediately stops the process.
To cancel at your new registrar, contact their support to withdraw your transfer request. They’ll cancel it and may refund your transfer fee, depending on their policies.
If you simply ignore all transfer emails and take no action, most transfers auto-cancel after 5-7 days of non-response. Keep in mind: canceling after paying the transfer fee doesn’t always guarantee a refund. Check your new registrar’s refund policy before starting transfers you might cancel.
How Often Can I Transfer My Domain?
ICANN rules prohibit transferring domains more than once every 60 days. After completing a transfer, your domain enters a mandatory 60-day lock period before becoming eligible for another transfer.
This restriction exists to prevent domain hijacking through rapid successive transfers that confuse ownership tracking. However, you can transfer multiple domains to the same registrar simultaneously—the 60-day rule applies per domain, not per registrar account.
What’s the Difference Between Authorization Code and Transfer Key?
Nothing. These terms are completely interchangeable: Authorization Code, Auth-Code, EPP Code (Extensible Provisioning Protocol), Transfer Key, Transfer Code, and Auth-Info Code.
Different registrars use different terminology, but they all refer to the same thing: a unique alphanumeric string that proves you own the domain and authorize its transfer. Use whichever term your registrar uses, knowing they all mean the identical thing.
Will Email Service Transfer With My Domain?
No. Email service is separate from domain registration. If your current registrar provides email hosting tied to your domain, those email accounts won’t automatically transfer.
Before transferring your domain, you must export all emails from current provider, set up email hosting with new provider (or separate email service), update MX records to point to new email server, import emails to new provider, and test email sending and receiving.
Many people use separate email providers like Google Workspace or Microsoft 365 specifically to avoid this complication. When your email hosting is independent of domain registration, registrar transfers have zero email impact.
Are Some Domain Extensions Non-Transferable?
Most popular domain extensions (.com, .net, .org, .info, .biz) follow standard ICANN transfer protocols. However, some country-code top-level domains use different processes.
Standard transfer process applies to .com, .net, .org, .info, .biz, .us, .ca, and .co extensions. Different transfer processes apply to .uk (uses IPS tag system instead of auth codes), .de (requires specific German registrar authentication), .au (needs business verification for commercial domains), and .fr (registry manages transfers directly).
Before transferring less common domain extensions, verify the specific requirements for that TLD. Your new registrar’s documentation should outline any special procedures needed.
Ready to Take Control of Your Domain?
Transferring your domain name doesn’t require technical expertise—just patience, attention to detail, and the willingness to follow a proven process. You’ve now absorbed everything needed to execute a flawless transfer.
Remember the core principles: verify eligibility first, maintain accurate contact information, secure your authorization code, and monitor progress throughout the 5-7 day window. Most transfers complete without issues when you follow these fundamentals systematically.
For website owners managing aged domains from Most Domain, transferring to a reliable registrar with transparent pricing protects your investment. These established domains deserve registrars offering robust security, reliable DNS infrastructure, and responsive customer support.
The perfect time to transfer your domain is before you desperately need to. Don’t wait until your current registrar raises prices, experiences extended outages, or provides frustrating customer service. Proactive transfers during calm periods always proceed more smoothly than reactive transfers during crisis moments.
Your Next Steps Start Now
Log into your current registrar and verify your domain’s eligibility today. Choose your new registrar based on features that matter to you. Unlock your domain and request your authorization code this week. Initiate the transfer while the process is fresh in your mind. Bookmark this guide for reference during your transfer journey.
Questions about specific aspects of your transfer situation? The domain community thrives on shared knowledge—when you successfully complete your transfer, consider sharing your experience to help others navigate their own domain migrations.
Don’t let another renewal cycle pass while paying excessive fees or tolerating subpar service. Your domain deserves better, and now you have the knowledge to make that change happen. Transfer with confidence, knowing you’re following the exact process that thousands of successful domain owners use every day.
Take action today—unlock your domain and start the transfer process that puts you back in control of your online presence.
References
- Cloudflare Learning Center – Domain Name Transfer Guide
- ICANN Domain Transfer Policy Documentation
- Wix Domain Transfer Resources
- HubSpot Domain Management Guide
- Namecheap Domain Transfer Knowledge Base
- GoDaddy Transfer Help Documentation
- Bluehost Domain Transfer Support Articles
- DNSimple Domain Transfer Checklist
- Internet Corporation for Assigned Names and Numbers Official Resources


